
The Slingshot B3 Light Traction Kite is now for sale at KiteLine Kiteboarding.
Here is what Slingshot has to say about the Slingshot B3 Light Traction Kite.
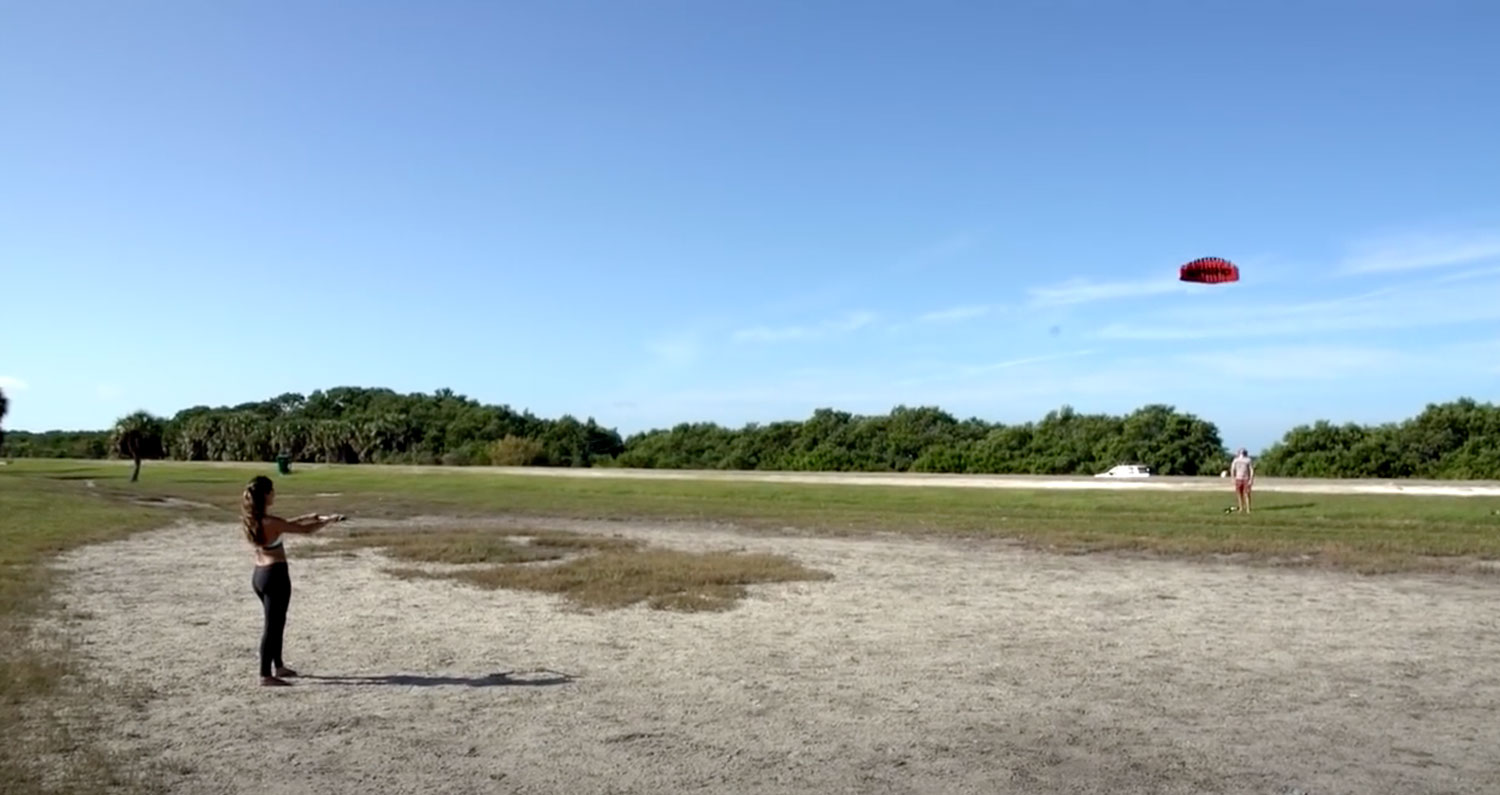
The Slingshot B3 Light Traction Kite comes in the following size. 3m
The Slingshot B3 Light Traction Kite is a fun, affordable and powerful piece of equipment ideal for a wide range of wind-related activities!
In light wind the Slingshot B3 Light Traction Kite is a great tool for practicing basic kite flying skills and kite control. In stronger wind the Slingshot B3 Light Traction Kite is a powerful tool for more advanced kite control, arm and shoulder strength and hand-eye coordination. The Slingshot B3 Light Traction Kite is also great for activities like skate-kiting. The Slingshot B3 Light Traction Kite is considerably more powerful than Slingshot’s smaller B2 trainer kite. For beginners, all-around family use and use in varying winds, we recommend starting with a Slingshot B2 Trainer Kite first, then graduating to the larger Slingshot B3 Light Traction Kite.
With the Slingshot B2 Trainer Kite you will:
- Learn basic kite skills safely and at your own pace
- Save time and money by learning the basics before paying for a lesson
- Develop the coordination and muscle memory crucial to kiteboarding
- Develop an understanding of the wind and what a kite will do in it
- Learn what to do and what not to do with a kite
- Be able to share the fun of kite flying with others, for years to come
- Learn kiteboarding concepts, terminology and jargon
Slingshot B2 Trainer kite tips and precautions:
- Always be aware of your surroundings and fly your kite in an open area free of obstacles like trees, power lines, fences, cars, buildings and/or other people.
- Double check your kite condition and bridles and connections before each use to ensure your kite is rigged properly and in proper working order.
- Be aware of the wind and weather conditions, both current and forecast, for the area in which you are flying your kite. Do not fly when lightning is present or in winds that are too gusty or strong for your strength and ability.
- Fly with a partner whenever possible.
- Use caution when landing and launching, especially if hot launching.
- Remember the concept “Red is Left.” The lines connecting your flying lines to your control bar are color coded (red and green). The side with the red connection will always go in your left hand.
- Use a safety leash, and use it properly.
- Wrap your lines properly and clean, rinse and dry your trainer kite after each use to ensure its longevity.
- Practice good habits. After getting a feel for your trainer kite, practice proper techniques that you can transfer to a larger kite, and be sure to practice equally on both sides. Practice skills like landing and launching, flying the kite with one hand, power strokes, control at the edge of the wind window, walking while flying the kite and basic body dragging position.
- Take a lesson from a certified instructor. Do not expect to translate trainer kite skills to a larger inflatable kite without getting proper instruction first.
Basic trainer kite concepts:
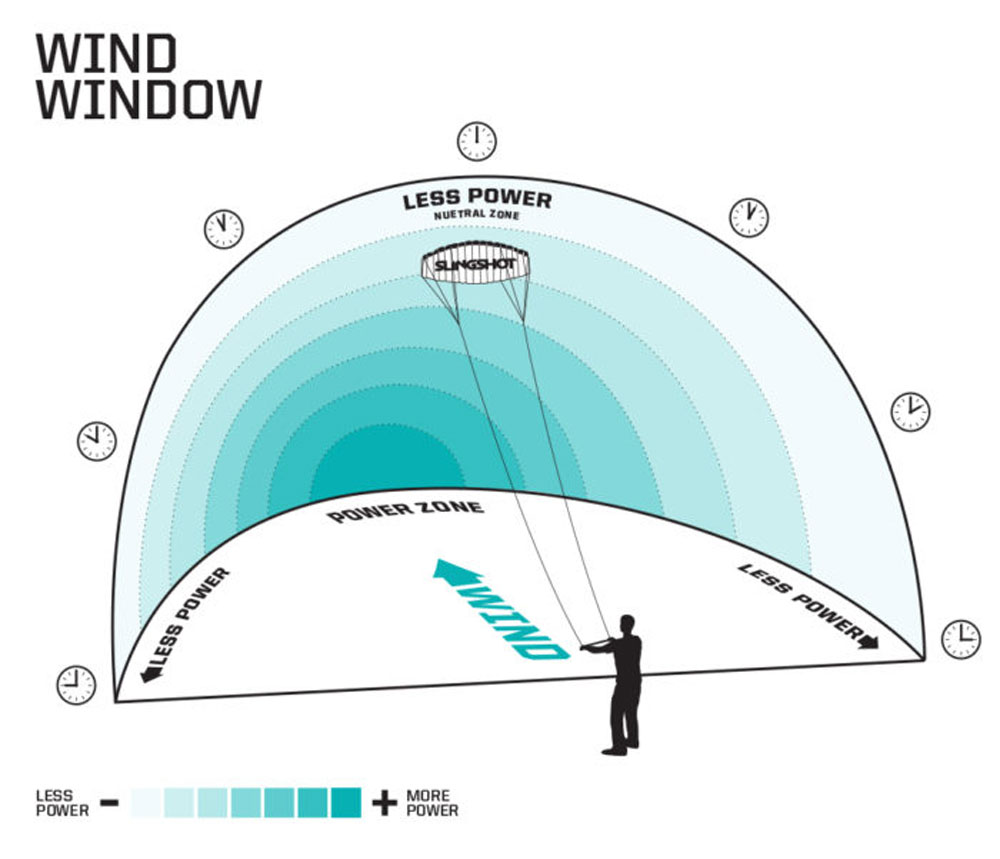
Wind window: The area of air space in which the kite can fly in relation to a particular wind direction. Roughly speaking, the area you can see with your field of view when facing directly down wind. The wind window is generally considered one-quarter of a sphere in relation to the pilot’s position.
Edge of the window: The upwind limit in which a kite will fly in the wind window. As the kite approaches the edge of the window, the surface area exposed to direct wind is reduced, thus reducing the kite’s relative power. Landing and launching is generally done with the kite at or near the edge of the window.
Neutral position: The area of air space directly overhead. The kite’s pull is limited when flying in the neutral position. Flying a full-size kite in the neutral position should be done with extreme caution due to the possibility of being lofted or pulled into the air.
Power zone: The area in the wind window in which the kite generates the most pull. The area directly downwind of the pilot is the most powerful zone.
Landing: The process of bringing the kite from the air safely to the ground. Generally done with a second person catching the kite, although a self-land can be done safely with a little practice.
Launching: The process of getting the kite up in the air. Often done with a second person holding the kite in the proper position, although a self-launch can be done safely with a little practice.
Hot launch: Launching with the kite positioned directly downwind of the pilot. A hot launch should generally be avoided but can be appropriate when launching a trainer kite in light wind.
Power stroke: The process of steering the kite through the wind window and power zone to generate power and pull. In general, the safest power stroke motion is to keep the kite on one side of the window and steer it up and down as opposed to steering the kite quickly from side to side across the window.
Kite loop: The action of steering the kite (either intentionally or unintentionally) in a full circle by pulling on one side of the control bar until the kite completes a full rotation.
Under powered: A situation in which the combination of wind strength and kite size are inadequate for proper kiteboarding or kite flying.
Overpowered: A situation in which the combination of wind strength and kite size results in too much power for ideal kiteboarding or kite flying conditions.
Relaunch: After crashing a kite, relaunching is the process of getting it back up into the air. Unlike an inflatable kite that maintains structure, a trainer kite can be tricky to relaunch on your own once it is crashed; you may need to walk to the kite, reposition it properly and anchor the trailing edge with sand before relaunching it from the control bar.
Kite school: Lessons from certified instructors at a kite school are highly recommended for anyone wanting to progress from flying a trainer kite to a full-size inflatable kite. Kiteboarding is an inherently risky sport, but with proper lessons and safety instruction those risks can be reduced significantly.
Basic trainer kite terminology:
Foil kite: A type of kite that uses closed cells to trap air and inflate the kite, as opposed to the inflatable leading edge typically used for kiteboarding. Foil kites tend to be more efficient and less fragile, making them great for learning the basics.
Leading edge: The windward edge of the kite- the edge of the kite that the wind encounters first. With a trainer kite, the leading edge features the kite’s open cells and is edge that should be facing up when self-launching.
Trailing edge: The rear or back edge of the kite. With a trainer kite, the trailing edge should be down on the ground when self-launching.
Control Bar: The bar setup attached to the steering lines that is used to steer and control the kite.
Wing tips: The sides of the kite. The wing tips connect the leading edge and the trailing edge.
Bridle: A series of lines that give the kite structure when flying, properly connect the kite to its steering lines and give the pilot proper steering and control over the kite. Trainer kite bridles consist of several lines that need to be straightened and untwisted properly before each use. Inflatable kites have much simpler bridles or none at all.
Pig tails: The connection point between kite and steering lines. Short sections of thick line with a knot or knots at the end, attached to the kite’s wingtips or bridle. Trainer kites have two pig tails at the axis of the bridle.
Flying lines: High strength lines that connect the control bar with the kite and give the pilot control of the kite. Trainer kites generally have two flying lines, while a full-size inflatable has four.
Color coded connectors: Red goes to red and green goes to green; color coded connectors help ensure proper connection of the steering lines to the kite.
Larks head knot: A simple and secure loop-based knot used to connect the flying lines to the kite.
Control bar: The bar used to steer and control the kite.
Kite leash: A safety system that connects the pilot to one of the kite’s lines via a simple leash. When using a trainer kite, the leash is generally attached to the pilot’s wrist on one end a ring at the end of one of the flying lines and will bring the kite safely to the ground in the event that the pilot lets go of the control bar.
| Summary | Slingshot B3 Kiteboarding Trainer Kite |
|---|---|
| Included Items | Slingshot B3 Light Traction Kite, Comfortable EVA Grip Control Bar w/Lines, Safety Wrist Leash, Travel Bag, Online Video Instruction |
| Manufacturer | Slingshot |
Validate your login